Klocki - a program to play and edit sliding block puzzles and Sokoban levels
Version 7.02
Copyright © 2002-2005 Emir Palandi
Program written by Emir Palandi
The game:
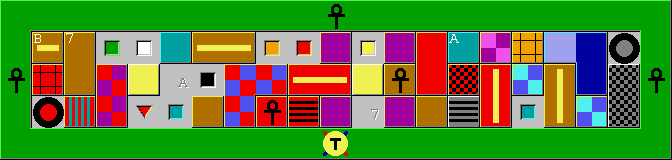
Blocks of different types slide over a floor with various kinds of marks.
Some blocks are movable, others are fixed in place. The move rules vary
according to the block type (see block and mark types).
A block cannot pass over the other blocks. A block cannot, except the
hover and the box, be pushed by another block. The marks don't move and indicate a
special behavior when the blocks are or pass over them.
The first objective of the game is to move all master blocks (one of their colors is red) to the places marked by the destination marks (the small red squares) and all alphanumeric blocks (those with a single character at the upper left corner) to the corresponding alphanumeric marks. A second aim is to do it in the least number of moves and a third in the least number of steps.
This game is a version of the Klotski game and the Andreas Rottler's Bricks game, but with more block types and floor elements. It's also a version of the Sokoban game.
How to play:
To move a block, move the mouse cursor to the block and, while pressing the left
mouse button, drag the mouse. Or click on the block with the left mouse
button and use the arrow keys on the keyboard. To eliminate a weak
barrier, click on it with the left mouse button.
A level is considered solved when all six conditions occur:
1) every basic block of every master block is over a destination mark.
2) every destination mark is covered by a master basic block.
3) every basic block of every alphanumeric block is over the corresponding
alphanumeric mark.
4) every alphanumeric mark is covered by the corresponding alphanumeric basic
block.
5) no "don't cover" mark is covered by a block other than the hover.
6) every round mark is covered by a round basic block of the same color.
The program indicates the solved status by a congratulation message.
When the program starts, if the best solution for
the level shown exists, it's automatically loaded.
Acknowledgements:
Thanks to Andreas Rottler for creating the Bricks game: Klotski
enriched with several new block types and hundreds of levels.
Thanks to Nolan Pflug for writing the Bricks for Windows
version and for providing information on how to create a DLL for it.
See also:
Menu
Glossary
Mouse usage
Keyboard usage
Coordinate display
Number of moves, steps and records
Status bar
Choosing a level - Scoreboard
Best solution
Options
How to input levels
How to edit and create levels
Klocki format
Some program features
Level designers
Incompatibilities between versions
Installation
Some known problems
The blocks are normally movable, do not interact with each other, one block
can not pass over other blocks, nor push other blocks. The exceptions are
described below. In the descriptions below, "contact" means one
block being immediately at right, left, above or below the other block.
![]()
![]() normal and normal master. Alternate drawings (tires):
normal and normal master. Alternate drawings (tires): ![]() and
and ![]() .
.
![]()
![]() magic and magic master (the same as normal master): a magic block
is normally made of separated basic blocks, but the whole block move as one.
magic and magic master (the same as normal master): a magic block
is normally made of separated basic blocks, but the whole block move as one.
![]()
![]() magnet and magnet master: if they contact any magnet block, they
fuse into one magnet block. If one block is a magnet master, they become a
magnet master. They can not make contact with an antimagnet block.
magnet and magnet master: if they contact any magnet block, they
fuse into one magnet block. If one block is a magnet master, they become a
magnet master. They can not make contact with an antimagnet block.
![]()
![]() antimagnet and antimagnet master: if they contact any antimagnet
block, they fuse into one antimagnet block. If one block is an antimagnet
master, they become an antimagnet master. They can not make contact with a
magnet block.
antimagnet and antimagnet master: if they contact any antimagnet
block, they fuse into one antimagnet block. If one block is an antimagnet
master, they become an antimagnet master. They can not make contact with a
magnet block.
![]()
![]() horizontal and horizontal master: they move only horizontally.
horizontal and horizontal master: they move only horizontally.
![]()
![]() vertical and vertical master: they move only vertically.
vertical and vertical master: they move only vertically.
![]() blockade:
this block can only be moved after a keystone block contacts a keyhole, when all
blockade blocks become normal blocks. When a blockade switch is uncovered
after being covered by any block, except the hover, every blockade block is
replaced by a blockade switch and every blockade switch is replaced by a
blockade block. When a blockade turns into a blockade switch, if there is
a mark under the blockade, it is replaced by the switch and does not return when
the switch is turned back to a blockade.
blockade:
this block can only be moved after a keystone block contacts a keyhole, when all
blockade blocks become normal blocks. When a blockade switch is uncovered
after being covered by any block, except the hover, every blockade block is
replaced by a blockade switch and every blockade switch is replaced by a
blockade block. When a blockade turns into a blockade switch, if there is
a mark under the blockade, it is replaced by the switch and does not return when
the switch is turned back to a blockade.
![]()
![]() keystone and keystone master: when they contact a keyhole, all
keystones vanish, all keyholes become frames and all blockade blocks become
normal blocks.
keystone and keystone master: when they contact a keyhole, all
keystones vanish, all keyholes become frames and all blockade blocks become
normal blocks.
![]()
![]() eliminator and eliminator master: when they contact another
eliminator or a water mark, both elements disappear.
eliminator and eliminator master: when they contact another
eliminator or a water mark, both elements disappear.
![]() frame:
is a fixed block.
frame:
is a fixed block.
![]() keyhole:
is a fixed block. When a keystone block makes contact with it, all
keystone blocks disappear, all keyholes become frames and all blockade blocks
become normal blocks.
keyhole:
is a fixed block. When a keystone block makes contact with it, all
keystone blocks disappear, all keyholes become frames and all blockade blocks
become normal blocks.
![]() strong
barrier: is a fixed block. Can be eliminated after all its basic
blocks become weak. A strong barrier basic block becomes weak when any
master block makes contact with it.
strong
barrier: is a fixed block. Can be eliminated after all its basic
blocks become weak. A strong barrier basic block becomes weak when any
master block makes contact with it.
![]() weak
barrier: is a fixed block. Can be eliminated when all its basic blocks
are weak.
weak
barrier: is a fixed block. Can be eliminated when all its basic blocks
are weak.
![]()
![]() cover and cover master: the only difference between them and other
blocks is that when they fall into holes, the holes covered also disappear.
cover and cover master: the only difference between them and other
blocks is that when they fall into holes, the holes covered also disappear.
![]()
![]() hover and hover master: they can pass over all marks, interacting
with none of them (except the hover master when it's over a destination
mark). They can be pushed by other blocks when they move.
hover and hover master: they can pass over all marks, interacting
with none of them (except the hover master when it's over a destination
mark). They can be pushed by other blocks when they move.
![]()
![]() box and box master: they cannot be moved directly by the mouse or by
the keyboard, but must be pushed by another block when it moves. A block
can push a line of hovers with no more than one box in the line. This is
the box movement rule of the Sokoban game.
box and box master: they cannot be moved directly by the mouse or by
the keyboard, but must be pushed by another block when it moves. A block
can push a line of hovers with no more than one box in the line. This is
the box movement rule of the Sokoban game.
![]() teleporter:
is a fixed block that indicates the teleport behavior.
teleporter:
is a fixed block that indicates the teleport behavior.
![]() alphanumeric
block: any movable block, master or not, and the blockade can be an
alphanumeric block. Possible characters: "a" to "z",
"A" to "Z", "ç", "Ç" and "0"
to "9". A "0" (zero) alphanumeric block is shown as
"Ø" to avoid confusion with the letter "O".
alphanumeric
block: any movable block, master or not, and the blockade can be an
alphanumeric block. Possible characters: "a" to "z",
"A" to "Z", "ç", "Ç" and "0"
to "9". A "0" (zero) alphanumeric block is shown as
"Ø" to avoid confusion with the letter "O".
![]() round
block: there can be up to 32 different round block types, each one with a
different color. A level is considered not solved if some round mark is
not covered by a round basic block of the same color, but not every basic round
block needs to be over some round mark.
round
block: there can be up to 32 different round block types, each one with a
different color. A level is considered not solved if some round mark is
not covered by a round basic block of the same color, but not every basic round
block needs to be over some round mark.
![]() destination:
marks the places where the master blocks should be for the level to be
considered solved.
destination:
marks the places where the master blocks should be for the level to be
considered solved.
![]() trap:
when a trap becomes uncovered after being covered by any block, except the
hover, the trap is replaced by a frame.
trap:
when a trap becomes uncovered after being covered by any block, except the
hover, the trap is replaced by a frame.
![]() hole:
when any block but the hover is totally over holes the block disappears.
If the block is a cover, the holes covered also disappear.
hole:
when any block but the hover is totally over holes the block disappears.
If the block is a cover, the holes covered also disappear.
![]() water:
no block, except the hover, can pass over the water. It vanishes when an
eliminator contacts it.
water:
no block, except the hover, can pass over the water. It vanishes when an
eliminator contacts it.
![]() blockade
switch: when a blockade switch becomes uncovered after being covered by any
block, except the hover, every blockade block is replaced by a blockade switch
and every blockade switch is replaced by a blockade block. This switching
process continues to be active even after a keystone activates a keyhole.
When a keystone is simultaneously moved from over a blockade switch and makes
contact with a keyhole, the behavior varies according to the Bricks
compatibility state in the options window: if it's
checked, no inversion will take place.
blockade
switch: when a blockade switch becomes uncovered after being covered by any
block, except the hover, every blockade block is replaced by a blockade switch
and every blockade switch is replaced by a blockade block. This switching
process continues to be active even after a keystone activates a keyhole.
When a keystone is simultaneously moved from over a blockade switch and makes
contact with a keyhole, the behavior varies according to the Bricks
compatibility state in the options window: if it's
checked, no inversion will take place.
![]() don't
cover: blocks can pass over this mark or stay over it. A level is
considered not solved if any mark of this type is covered by a block other than
a hover.
don't
cover: blocks can pass over this mark or stay over it. A level is
considered not solved if any mark of this type is covered by a block other than
a hover.
![]() ice:
when a block, except a hover, is completely over ices or completely over ices
and holes, the block repeats its last step. It's possible to create a
level with ices and teleport where a block would endlessly slide over the ices.
Because of this, the automatic last step repetition stops after a certain number
of steps.
ice:
when a block, except a hover, is completely over ices or completely over ices
and holes, the block repeats its last step. It's possible to create a
level with ices and teleport where a block would endlessly slide over the ices.
Because of this, the automatic last step repetition stops after a certain number
of steps.
![]() glue:
when a block, except the hover, is over a glue element, even if only partially,
it cannot be moved.
glue:
when a block, except the hover, is over a glue element, even if only partially,
it cannot be moved.
![]() alphanumeric
mark: marks the places where the corresponding alphanumeric block should be
for the level to be considered solved. Possible characters: same as those
for alphanumeric blocks. A "0" (zero) alphanumeric mark is shown
as "Ø" to avoid confusion with the letter "O".
alphanumeric
mark: marks the places where the corresponding alphanumeric block should be
for the level to be considered solved. Possible characters: same as those
for alphanumeric blocks. A "0" (zero) alphanumeric mark is shown
as "Ø" to avoid confusion with the letter "O".
![]() round
mark: there can be up to 32 different round mark types, each one with a
different color. A level is considered not solved if some round mark is
not covered by a round basic block of the same color, but not every basic round
block needs to be over some round mark.
round
mark: there can be up to 32 different round mark types, each one with a
different color. A level is considered not solved if some round mark is
not covered by a round basic block of the same color, but not every basic round
block needs to be over some round mark.
Cell: it's a unit square. The board is divided into rows and
columns of cells.
Mark: indicates a cell property, activated when a block is or passes over
the cell.
Basic block: a one unit high and wide block. A block is an assembly
of basic blocks that move together.
Block: a set of basic blocks that move as one unit.
Block head: the leftmost basic block of the top
row of the basic blocks of the block.
Step: the movement of a block from a cell to a neighbor cell.
Move: a sequence of steps made by the same block.
Selected block: every time a block is moved,
using the mouse or the keyboard, or when a directly movable block receives a left button
mouse click, it becomes the selected block, which can be moved using the
keyboard arrow keys. If the level has only one directly movable block,
this block is automatically selected when an arrow key is pressed. If the Mark the selected block item in the options
window is checked, the selected block is indicated by a small white dot.
Sokoban (copyright © 1982 Thinking Rabbit Inc., Japan):
a game
created by Hiroyuki Imabayashi, where a warehouse keeper (sokoban in Japanese) must move several boxes
to their destinations.
Numerical order: is the order of the levels
as they appear in memory.
NBL format: the file format of the Bricks
Level Editor program by Martin Oehm.
Bricks: Andreas Rottler's Bricks
game.
DLL format: the format of a DLL file for Bricks for Windows.
Plain text: is text without any formatting such
as paragraph justification, character font such as Times New Roman,
character style as bold or italic, text color or size, etc.
Input and output:
"S": saves the current level in a Klocki
format file.
"4": saves the current level in an SOK format
file.
"U": saves the current level in an NBL
format file.
"Y": saves user chosen levels in a DLL
format file.
"H": write the current level moves in
a file in a format compatible with the Bricks Load
board command.
"Ctrl+C": copies the current level and moves to the Windows
Clipboard, in the Klocki format.
"Ctrl+B": copies the current level and moves to the Windows
Clipboard, in the SOK format.
"W": writes the current level drawing as GIF image
or animation.
"K": reads levels from a file, in Klocki,
SOK, NBL or DLL format.
"J": reads moves for the current level
from a file written by the write Bricks moves
command or by the Bricks Save board command.
"Ctrl+V: copies a level (possibly with moves), which must be in the Klocki
format or in the SOK format from the Windows Clipboard.
Levels:
"+" or "=": next level in the numerical
order.
"-": previous level in the numerical order.
"L": shows a level list and, optionally,
the scores.
When changing levels, the previous level position and moves are not lost.
When going back to the previous level, its position is restored. If no moves
were done in the new level, if a best solution exists for the level, it's
applied to the level.
"N": opens the level creation and editing
window.
"T": opens the title change window.
"D": deletes the current level from memory.
"F12": shuffle blocks.
Block movement:
"R" or "Home": goes to the current level starting position,
without losing the moves.
"E" or "End": goes to the current level end position.
"G": go to the chosen move number.
"]": advances one move in the current level.
"[": goes back one move in the current level, without erasing the move
from memory.
"Page Down": advances 10 moves in the current level.
"Page Up": goes back 10 moves in the current level, without erasing
the moves from memory.
">" or ".": advances one step in the current level.
"<" or ",": goes back one step in the current level,
without erasing the step from memory.
"A": starts the automatic replay of the current level. To stop,
press any key or click the mouse on the level drawing.
Arrow keys: move the selected block one step in the
corresponding direction. If the level has only one directly movable block,
this block is automatically selected when an arrow key is pressed.
"Ctrl": when moving a block with the mouse, the block moves only
horizontally.
"Alt": when moving a block with the mouse, the block moves only
vertically. These two movement restrictions are useful for not
inadvertently activate some mark in a crowded level.
"M": shows a list of moves. These moves
can be applied to the same or another level.
"B": best solution commands.
Block annotation:
These options mutually exclusive: activating one of them, deactivates the
others. The option in effect is indicated by a small circle at the left of
the corresponding menu line.
"Z": sets the reference position for the individual block move counts
at the current position.
"C": shows, for each movable block, the count of moves done with it
since (if positive) or up to (if negative) the chosen reference position.
For hovers, the count includes only the moves made directly with them, not
counting the moves when they were pushed by other blocks. For boxes, it is
the count of steps where they were pushed since the initial
position. A barrier removal
is considered to belong to the next move if it is at the starting position or to
belong to the previous move if not at the starting position.
"I": shows, for each movable block, an unique alphabetic
identifier. Except for the alphanumeric blocks, these identifiers are
automatically chosen by the program without relation to the block identifiers of
the Klocki format. The alphanumeric block
identifiers are always shown.
"V": shows the path taken by the head of the selected
block from the starting position to the current position.
"X": doesn't show the move counts, the block identifiers nor the block
paths.
The character size of the block annotations follows the cell size. If
the level number of rows or columns is too large, the annotations can be hard to
read and can clutter the drawing. When this happens, the block
identifiers and individual move count status bar
panel can be used to see the identifiers and each block move count.
Showing and hiding marks:
"Q": alternates between drawing a mark over (show) or under (hide) a
block when both are at the same cell. This
option is also available in the options window and
it's written to the Windows Registry.
Program window position and size:
"1", "2" or "3": make the program window height
equal to the screen work area height and the program window width 1/1, 1/2 or
1/3 of this area width.
"@" and "#": analog to "2" and "3", but
dividing the height instead.
"!": centers the program window in the screen work area.
(screen work area: the whole screen minus the Windows taskbar.)
Drawing position and size:
If the Automatic board sizing item in the options
window is checked, the drawing size is automatically adjusted to the largest
size that fits the program window. Otherwise, the "*" (zoom in),
"/" (zoom out) and "F" (fit to window) keys can be used to
manually change the size.
More options:
Letter "O": options window.
Help and information:
"F1": shows this help text.
"F2": shows some information about the program.
Other commands:
"P": opens another program instance, independent from the current one,
at the same level as the current one, if this level exists in the Klocki
n.txt files. The best solution for the level, if it exists, is also
automatically loaded. The Klocki.sol file, the options
read from the Windows Registry, and the file open
history are the same for both instances.
In this document, a "click" means a "left mouse button click".
To move a block, move the mouse cursor to the block, press the left button
and drag to the destination.
If a Ctrl key is pressed, the block moves only horizontally. If an Alt
key is pressed, the block moves only vertically. These two movement
restrictions are useful for not inadvertently activate some mark in a crowded
level.
To eliminate a weak barrier block, click on it.
To set the origin of the coordinate display, double click on the cell which will
have coordinates 1 and 1.
If the mouse has a wheel, most program scroll bars can be moved rotating the wheel.
Each menu line shows the corresponding keyboard shortcut.
Input and output:
Save as Klocki: saves the current level in a
file, in the Klocki format.
Save as SOK: saves the current level in a
file, in the SOK format.
Save as NBL: saves the current level in a file,
in the NBL format.
Save as DLL: saves user chosen levels in a DLL
format file.
Write as GIF animation: writes the current level drawing as GIF
image or animation.
Write Bricks moves: writes the current level
moves in a file in a format compatible with the Bricks
Load board command.
Copy to Clipboard (Klocki): copies the current level and moves to the Windows
Clipboard, in the Klocki format.
Copy to Clipboard (SOK): copies the current level and moves to the Windows
Clipboard, in the SOK format.
Read levels: reads levels from a file, in Klocki,
SOK,
NBL or DLL format.
Read Bricks moves: reads moves for the
current level from a file written by the write
Bricks moves command or by the Bricks Save board
command.
Copy from Clipboard: copies a level, which must be in the Klocki
format or in the SOK format, possibly with moves, from the Windows Clipboard.
Levels:
New level - Edit: opens the level creation and
editing window.
Title change: opens the title change window.
Delete level: deletes the current level from memory.
Level list - Scoreboard: shows a level list
and, optionally, the scores.
Next level: next level in the numerical order,
without losing the current level position.
Previous level: previous level in the numerical
order, without losing the current level position.
After any of these commands, if no moves were done in the new level, if a best
solution exists for the level, it's applied to the level.
Shuffle blocks: shuffle blocks.
Block movement:
Restart level: restarts the current level, without losing the moves.
End of level: goes to the end of the level moves.
Go to move: goes to the chosen move number.
Move forward: advances one move in the current level.
Move backward: goes back one move in the current level, without erasing
the move from memory.
Move forward 10: advances 10 moves in the current level.
Move backward 10: goes back 10 moves in the current level, without
erasing any move from memory.
Step forward: advances one step in the current level.
Step backward: goes back one step in the current level, without erasing
the step from memory.
Automatic replay: starts the automatic replay of the current level.
To stop, press any key or click the mouse on the level drawing.
Move list: shows a list of moves. These
moves can be applied to the same or another level.
Best solution: best solution commands.
Block annotation:
These options mutually exclusive: activating one, deactivates the others.
The option in effect is indicated by a small circle at the left of the
corresponding menu line.
Zero move count: sets the reference position for the individual block
move counts at the current position.
Count moves: shows, for each movable block, the count of moves done with
it since (if positive) or up to (if negative) the chosen reference
position.
For hovers, the count includes only the moves made directly with them, not
counting the moves when they were pushed by other blocks. For boxes, it is
the count of steps where they were pushed since the initial position. A
barrier removal is considered as belonging to the next move if it is at the
start of the moves or as belonging to the previous move if it is not at the
start.
Identify blocks: shows, for each movable block, an
unique alphabetic identifier. Except for the alphanumeric blocks, these
identifiers are automatically chosen by the program without relation to the
block identifiers of the Klocki format. The
alphanumeric block identifiers are always shown.
View block path: shows the path taken by the head
of the selected block from the starting position to
the current position.
No block annotation: doesn't show the move counts, the block identifiers
nor the block paths.
The character size of the block annotations follows the cell size. If the
level number of rows or columns is too large, the annotations can be hard to
read and can clutter the drawing. When this happens, the block
identifiers and individual move count status bar
panel can be used instead.
Showing and hiding marks:
Marks over blocks: alternates between drawing a mark over (show) or under
(hide) a block when both are at the same cell. The small circle at the
left of the menu line indicates drawing marks over blocks. This
option is also available in the options window and
it's written to the Windows Registry.
Program window position and size:
Full window size: makes the program window size equal to the screen work
area.
1/2 window width: window width 1/2 of screen work area, full height.
1/3 window width: window width 1/3 of screen work area, full height.
1/2 window height: window height 1/2 of screen work area, full width.
1/3 window height: window height 1/3 of screen work area, full width.
Centralize window: centers the program window in the screen work area.
(screen work area: the whole screen minus the Windows taskbar.)
Drawing position and size:
If the Automatic board sizing item in the options
window is checked, the drawing size is automatically adjusted to the largest
size that fits the program window. Otherwise, the Zoom in, Zoom
out and Fit to window commands can be used to manually change the
size.
Other options:
Options window
Help and information:
Help: shows this help text.
About Klocki: Shows some information about the program.
Other commands:
New program instance: opens another program instance, independent from
the current one, at the same level as the current one, if this level exists in
the Klocki n.txt files. The best solution for the
level, if it exists, is also automatically loaded. The Klocki.sol
file, the options read from the Windows Registry,
and the file open history are the same for both
instances.
Klocki n.txt files:
These are Klocki format plain
text files with only the level title and board description, without the
moves. "n" must be a non-negative integer number. A list
of these numbers can be specified at the Initial files field in Game
options. At program startup, the Klocki n.txt
files will be read in the order of their numbers in the list. If the list
is blank, the Klocki 0.txt file will be read.
Klocki.rec file:
It's the move records file. It includes also
the records for the levels sent by Klocki users.
Klocki.sol file:
It's the best solutions file. If this file
does not exist, it's automatically created in the program folder after a level
is solved.
Klocki.htm file:
It's this help file. For the program help buttons and the F1 key to
work, there must be a program set up to open files of type HTML.
This is usually done when an Internet browser is installed in the system.
PNG image files:
Image files used by the Klocki.htm file, stored in the HelpImages
subfolder.
Klocki.exe file:
It's the program file.
Important:
All files must be in the same folder and the name before the extension (before
the " n.txt" for the Klocki n.txt files) must be the same, or
else the program will not be able to find them.
The game and file options are written into the Windows Registry entry:
\HKEY_CURRENT_USER\Software\Emir
Palandi\name\Options
and the file open history into the entry:
\HKEY_CURRENT_USER\Software\Emir
Palandi\name\History
where name is the program name without the ".exe".
If the program is renamed, the names of all the other files must be changed in
accordance too, the Registry entries where these data will be written will also
change and the program will not be able to read the data written before the name
change.
To easy writing down the moves and to identify the block that will move at
each line of the Klocki format and the move
list display, the program can show at the status bar, at the bottom of the
window, a panel with the mouse cursor coordinates, in number of cells, counting
from the origin. y is the row, from top to bottom. x
is the column, from left to right.
To set the origin of the coordinate display, double click on the cell that will
have coordinates 1 and 1.
This panel will be shown only if the Show mouse coordinates item in the options
window is checked.
Number of moves, steps and records
The status bar at the bottom of the window can show a panel with text in the
form:
Move cm/tm, step cs/ts. Records: mr, sr. (when the
move does not solve the level) or
Move cm/tm (dm), step cs/ts (ds). Records: mr, sr.
(when the move solves the level)
where:
cm is the current move number,
tm is the total move number,
dm is the difference between cm and the number
of moves of the best solution,
cs is the current step number,
ts is the total step number and
ds is the difference between cs and the number
of steps of the best solution.
mr and sr are the move and step records as
written in the Klocki.rec file. If a record value is
unknown (a zero value at the corresponding line in the file), a "?" is
displayed in its place.
If the program window is not wide enough, this text may not be totally
visible. Pausing the mouse cursor over this panel for awhile, a box
appears with the whole text.
A barrier removal is not counted as a move nor as a step.
The steps made automatically by a block when it slides over ices are not
counted.
The records file is read only when the program starts or when the level
choice command is issued. If this file is altered while the program is
running, to update the records indication, it's enough to simply open and
immediately close the level choice window.
This panel is shown only if the Show total moves and records item in the options
window is checked.
See also:
Glossary
Block identifiers and individual move count
The status bar at the bottom of the window can show a panel with
text in the form:
"i", m
where
i can be one or two characters, unique for each block,
the same as the identifier of the block under the mouse cursor (see annotation),
and
m is the number of moves done so far by the block
under the mouse cursor (the same as the move count annotation).
For hovers, the count includes only the moves made directly with them, not
counting the moves when they were pushed by other blocks. For boxes, it is
the count of steps where they were pushed since the initial position.
The character size of the block annotations follows the cell size. This
panel can be useful when the level is too large and the annotations are hard to
read and clutter the drawing.
This text is only shown for a movable block or for a blockade block.
This panel is shown only if the Show identifiers and individual moves
item in the options window is checked.
At the bottom of the program window, a status bar can have three panels:
- the mouse coordinates.
- an identifier and number of moves done by the
block under the mouse cursor.
- the total number of moves, steps and records.
These panels can be displayed or not according to the Show mouse coordinates,
Show identifiers and individual moves and Show total moves and records
items in the options window.
If none of these panels is displayed, the status bar is not shown, increasing
the screen space available to show the level.
This window shows a list of moves, one move per line.
All the moves or only the part selected by the user can be applied to the
current level.
The whole list can also be copied to the Windows Clipboard to be used by
another instance of the program or edited by a plain text
editor program and then read back.
When this window is shown or when the Current moves button is clicked on,
the list is built from all the current level moves, with coordinates relative to
the current coordinate origin. The list is not
updated automatically if the window is already visible and some block is moved
or the level or the coordinates are changed. To update the list, click on
the Current moves button. This allows building a level move list
and then applying it to another level.
To list the best solution moves, click on the Best
solution button.
To bring the current level back to the initial position click on the Restart
button.
To copy all the list to the Windows Clipboard, click on the >>>
Clipboard button.
To copy a list from the Clipboard, erasing the current one, click on the <<<
Clipboard button. Only lines starting with a space character are copied,
thus copying only move lines. So, to copy the moves from another program
instance, it's not necessary to open a move list dialog at this instance, copy
the moves to the Clipboard and then clicking on the >>>
Clipboard button at the destination instance. It's enough to simply go
to the other instance, issue the copy level to the Clipboard (Ctrl+C)
directly at the main window and click on the >>> Clipboard
button at the destination instance.
The Close button closes the window.
Choosing the moves to apply:
To select all moves in the list, click on the Select all moves button.
To select a single move, click on the corresponding line without pressing any of
the Shift or Ctrl keyboard keys.
To select a range of moves, select the first move as above and then, pressing a Shift
key, click on the final move.
To add or remove a move from the selection, press a Ctrl key and click on
the move.
For instance, to select all the moves but one in the middle of the list, click
on the Select all moves button and then, with a Ctrl key pressed,
click on the not to be applied move.
Applying the moves:
When applying the moves, make sure the current coordinate origin is compatible
to the moves coordinates, so that the moves are applied to the correct
blocks. Choose the moves to apply and click on the Apply selected moves
button. If you double click on a line, the line is selected as above and
then the moves selected are applied. If, as a result of the applied moves,
the level is solved, the best solution processing
will occur.
The move format is:
n) yi, xi, yf, xf: ppppp...,
where:
n is the move number (preceded by one or more
spaces),
yi and xi are the coordinates, at the start of
the move, of any basic block of the block being moved,
yf and xf are the coordinates at the end of
the move and
p is one of the characters >, <, v,
^ or x, meaning, respectively, step right, step left, step down,
step up and barrier removal.
A barrier removal is treated as an independent move and listed in a separated
line, but its corresponding move number is the same as the next move if it is at
the start of the list or is the same as the previous move if it is not at the
start.
To apply the moves, the only field used are yi, xi and ppp...
and the others are ignored. In the case of a list copied from the Clipboard,
each line can be simply: yi, xi: ppppp... (yi preceded by one or
more spaces). The third part of the Klocki format
is compatible and can be imported through the Clipboard and applied.
Keyboard shortcut: M.
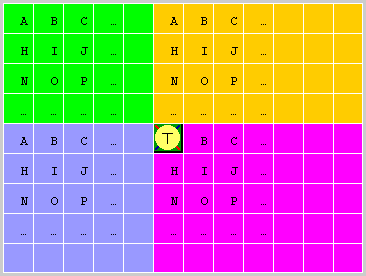
A teleport block divides the level into four parts indicated by
different colors in the picture above.
After a block is moved one step, possibly interacting with marks and other
blocks, if it's valid, according to the game rules, to put the block in the
opposite position relative to the teleport block position, and if this position
exists, it will be put in
this position, possibly interacting again with marks and other blocks. The
block is considered to be in the part where it's block
head is. The correspondence between the original and destination
positions is indicated by letters in the picture above. Thus, a block
that, when moved, it's block head fall at position ![]() ,
if it's valid to put it in the
,
if it's valid to put it in the ![]() position, it will be moved to this position and vice-versa. The same for
position, it will be moved to this position and vice-versa. The same for  and
and  .
.
If there are more than one teleport block, only one will be effective.
Note: if the rows and columns are numbered starting from 0, then the horizontal displacement is equal to the teleport block column number and the vertical displacement is equal to this block row number.
This window shows a list of all levels currently in memory and can also show
score data.
Choosing a level:
To go to a level, click on the corresponding line and then on the Go to
selected level button. Or simply double click on the line.
When a line is selected, the corresponding level is shown on the main program
window.
To select the current level, click on the Current level button.
Searching for a level:
To search for a level, type some part of the level title at the box labeled Find
title with and then click on one of the search buttons. When the title
entry box is active (there is a blinking cursor on it), pressing the Enter
key has the same effect as clicking on the Search down button. When
searching down, if the level is not found until the list bottom, the search
restarts from the top of the list. When searching up, if the level is not
found until the list top, the search restarts from the start of the list.
The text match is case-insensitive.
Sorting the level list:
Clicking on the header of any column, if the last sorting was on this column,
the list order is inverted. If not, the list is sorted in ascending order
on the column. The sorting direction is indicated by an arrow in the
column header.
If the Keep selected box is checked, the selected level remains the same
and visible in the list. If not, the top level will be selected.
The lines with a "?" in the sorting column remain at the bottom of the
list.
Score:
If the Score box is checked, the number of moves of the best
solution, the move number record, their difference and a box whose color
varies according to this difference are also shown. The records are stored
in the Klocki.rec file.
The difference is presented in absolute form:
moves - record
and relative form:
100% x (moves - record) / record
The box color follows the table below, according to the relative difference:
| negative or 0.00% | green |
| 0.01 to 4.99% | white |
| 5.00 to 9.99% | yellow |
| 10.00 to 24.99% | cyan |
| 25.00% or more | red |
When the record is unknown (zero in the Klocki.rec
file), the places corresponding to the record and the differences are marked by
"?" and the box color is orange.
When the level is unsolved, the places corresponding to the moves and the
differences are marked by "?" and the box color is red.
Total score:
The total score in a number of levels starting at the selected level is also
shown. The desired number of levels is entered in the box labeled Levels
to score. The number of levels actually scored can be less than the
number specified if the end of the list is reached prematurely. For each
level, the score is 1000 minus the number of moves.
Notes:
Keyboard shortcut: L.
A column width can be changed by dragging the right border of the column header.
This window permits the creation of a new level, the alteration of the
current level or reading a level from a file. It contains the command
buttons and title input box. The level being edited is shown at the main
program window. The level edges are indicated by a white rectangle.
Optionally, a grid dividing the level into cells or group of cells can be drawn
(see the Edit 1 page in the options window).
Basic operation:
The basic operation consist of first selecting the cells to alter and then
issuing the desired commands, either by clicking on the command buttons or
pressing the corresponding key, which is indicated at each button.
Upon finishing editing, the level can be added to the level list at the end of
the numerical order without altering the current
level (clicking on the Add button) or can replace the current level
(clicking on the Replace button).
Keyboard usage:
To call this window, press the N key.
For most buttons, it is possible to press the key indicated at each
button. For instance, the show this help text, it's possible to press the F1
key.
When using the keyboard to issue commands, make sure the title input box and the
alphanumeric character input box are not active (there is not a blinking cursor
on them) or else they will attract all keyboard input. To leave the title
entry mode or the alphanumeric character entry mode, press the Tab key or
click on one of the buttons.
Selecting the cell to edit:
The selected status of a cell is indicated by white lines drawn diagonally.
To invert the select status of a cell, click on it with the left mouse
button. To invert the select status of a rectangle of cells, click on a
vertex and drag the mouse to the diagonally opposite vertex.
To select none of the cells, click on the ![]() button.
button.
To restore the previous non-null selection, click on the ![]() button.
button.
To invert the select status of all cells, click on the ![]() button.
button.
Example 1: to select all but a few cells, select only these few ones and then
invert the whole selection.
Example 2: to create a frame, instead of creating four separated lines, you can
click on the ![]() button (if necessary), click on the cell where the upper left frame corner will
be, drag the mouse to the cell where the lower right frame corner will be,
release the left mouse button, click inside the frame, drag the mouse until the
interior is cleared and click on the
button (if necessary), click on the cell where the upper left frame corner will
be, drag the mouse to the cell where the lower right frame corner will be,
release the left mouse button, click inside the frame, drag the mouse until the
interior is cleared and click on the ![]() button.
button.
Selecting and unselecting a whole block:
To include all the cells of a block in the selected cells, click on any cell of
the block while pressing a Shift key.
To exclude all the cells of a block from the selected cells, click on any cell
of the block while pressing an Alt key.
To invert the selected state of all the cells of a block, click on any cell of
the block while pressing a Ctrl key.
Adding and deleting empty cells:
The ![]() button
adds rows and columns of empty cells around the board.
button
adds rows and columns of empty cells around the board.
The ![]() button
eliminates rows and columns of empty cells around the board.
button
eliminates rows and columns of empty cells around the board.
The ![]() button inserts empty cells at each selected cell. To make room for the
inserted cell, the row, starting at the selected cell is shifted to the
right. The rightmost cells are lost. The
button inserts empty cells at each selected cell. To make room for the
inserted cell, the row, starting at the selected cell is shifted to the
right. The rightmost cells are lost. The ![]() button does the same, but for columns and shifting down.
button does the same, but for columns and shifting down.
The ![]() button deletes each selected cell, compacting rows to the left and inserting
empty cells at the right. The
button deletes each selected cell, compacting rows to the left and inserting
empty cells at the right. The ![]() button does the same, but compacting columns upward.
button does the same, but compacting columns upward.
Rotating and mirroring cells:
The ![]() button
rotates the selected cells 90° counterclockwise. If all cells are
selected, the whole level is rotated. If not, the command will be executed
only if the selection has 90° symmetry. The
button
rotates the selected cells 90° counterclockwise. If all cells are
selected, the whole level is rotated. If not, the command will be executed
only if the selection has 90° symmetry. The ![]() and
and ![]() buttons do the same, but the rotations are 90° clockwise and 180°. In
the 90° rotations, the vertical blocks rotated are changed to horizontal and
the horizontal ones to vertical.
buttons do the same, but the rotations are 90° clockwise and 180°. In
the 90° rotations, the vertical blocks rotated are changed to horizontal and
the horizontal ones to vertical.
The ![]() button reverses horizontally the positions of the selected cells. The
command will be executed only if the selection has horizontal symmetry.
The
button reverses horizontally the positions of the selected cells. The
command will be executed only if the selection has horizontal symmetry.
The ![]() button does the same, but vertically.
button does the same, but vertically.
Copy to and from the Clipboard:
The ![]() button copies to the Windows Clipboard the level title and the smallest
rectangle containing all the selected cells in the Klocki
format. The unselected cells in this
rectangle are copied empty. If the whole level is selected and the level
has moves, the moves will also be copied. The
button copies to the Windows Clipboard the level title and the smallest
rectangle containing all the selected cells in the Klocki
format. The unselected cells in this
rectangle are copied empty. If the whole level is selected and the level
has moves, the moves will also be copied. The ![]() button does the same, but the selected cells are also cleared. There is no
command to copy to the Clipboard in the SOK format.
button does the same, but the selected cells are also cleared. There is no
command to copy to the Clipboard in the SOK format.
If the whole level is selected, when the ![]() button is pressed, the title, the blocks, the marks
and the moves are copied from the Clipboard.
button is pressed, the title, the blocks, the marks
and the moves are copied from the Clipboard.
If only part of the level is selected and the ![]() button is pressed, the Clipboard text must be in the Klocki
format and only the blocks and marks are copied to the selected cells. The
rectangle of cells in the Clipboard is aligned with the smallest
rectangle containing all selected cells, matching the top and the left
borders. The selected cells contents are copied from the correspondent
cell in the Clipboard and the not selected cells are left
unchanged. If there is no corresponding cell in the Clipboard, the
cell is also left unchanged. When copying only part of a level from the Clipboard, if this part has
an alphanumeric block and the rest of the level has an alphanumeric block with
the same identifier, they will join into a larger block. When copying a
non-alphanumeric block, it will be independent from other blocks already
existing in the level.
button is pressed, the Clipboard text must be in the Klocki
format and only the blocks and marks are copied to the selected cells. The
rectangle of cells in the Clipboard is aligned with the smallest
rectangle containing all selected cells, matching the top and the left
borders. The selected cells contents are copied from the correspondent
cell in the Clipboard and the not selected cells are left
unchanged. If there is no corresponding cell in the Clipboard, the
cell is also left unchanged. When copying only part of a level from the Clipboard, if this part has
an alphanumeric block and the rest of the level has an alphanumeric block with
the same identifier, they will join into a larger block. When copying a
non-alphanumeric block, it will be independent from other blocks already
existing in the level.
Overall changes:
To replace the level being edited by the current level, click on the ![]() button. If the current level is at the beginning (steps = 0), the move
list is also copied to the editing level.
button. If the current level is at the beginning (steps = 0), the move
list is also copied to the editing level.
To replace the level by a level in a file, click on the ![]() button. The program accepts files in the NBL, DLL,
SOK or Klocki formats. Only the first level in the
file will be read (see also using the file choice window).
If a Klocki or an SOK format file is read, the program also
reads the moves.
button. The program accepts files in the NBL, DLL,
SOK or Klocki formats. Only the first level in the
file will be read (see also using the file choice window).
If a Klocki or an SOK format file is read, the program also
reads the moves.
Moves:
If the level being edited has moves, the moves are deleted if any block or mark
is changed. When the window is closed by the Add or the Replace
buttons, and these moves result in the level solution, the best
solution processing will occur.
Title:
To alter the level title, type the new title in the Title box. The title
must not start with spaces, or else the program cannot find the corresponding
records in the records file. If the title is
invalid, the message Title (invalid) will be shown and the Add and
Replace buttons will be disabled. The best solution and the move
records for each level are identified by the level title. The presence of
different levels with the same title can upset the best solutions processing or
produce invalid record information. If there is another level with the
same title, the message Title (duplicated) will be shown.
Creating and editing blocks:
To create or edit a block, select all its cells and then click on the
corresponding button on the window or press the key indicated in the
button. Every basic block in the selected cells which were part of another
block will be deleted from the other block and added to the new block. To
enter a master block, enter the corresponding non-master type and then change
the type to master with the ![]() button. To convert to non-master, use the
button. To convert to non-master, use the ![]() button. To convert a block to alphanumeric, type the desired character in
the
button. To convert a block to alphanumeric, type the desired character in
the ![]() box and then click on the
box and then click on the ![]() button. To convert to a non-alphanumeric block, type a space character in
the same box and then click on the
button. To convert to a non-alphanumeric block, type a space character in
the same box and then click on the ![]() button. After this button is clicked on, if the alphanumeric
autoincrement option in the options window is
checked, the character in this box is automatically advanced to the next one.
To convert basic blocks to tires, select them and click on the
button. After this button is clicked on, if the alphanumeric
autoincrement option in the options window is
checked, the character in this box is automatically advanced to the next one.
To convert basic blocks to tires, select them and click on the ![]() button. Only the selected normal basic blocks or normal master basic
blocks will be converted. There is no button to convert back to normal
basic blocks. This can be done by selecting a whole block, clicking on the
button. Only the selected normal basic blocks or normal master basic
blocks will be converted. There is no button to convert back to normal
basic blocks. This can be done by selecting a whole block, clicking on the
![]() button
and converting to tires the basic blocks that must remain tires. To select
the color of a round block, click on the
button
and converting to tires the basic blocks that must remain tires. To select
the color of a round block, click on the ![]() button to show a color select window.
button to show a color select window.
If there are more than one teleport block, only
one will be effective.
At play time, all basic blocks of the new block will move as one unit, even if
they are separated. Thus the internal working of normal blocks and magic
blocks is the same, the only difference is their colors. If the new block
is a barrier, all of its parts must be turned weak to be eliminated, even if
they are separated.
The join barriers option in the options
window controls the insertion of barriers: if it's checked, when a barrier
is inserted, it and all other barriers touched by the new barrier are joined
together (note that the borders disappear). If it's unchecked, the new
barrier is independent from the other barriers (note that the borders remain).
The join magnets option in the options
window controls the insertion of magnet blocks: if checked, magnet blocks
that touch other magnet blocks of the same type are joined together, as if they
were touched during the play. If unchecked, these blocks are initially
independent, and they can be separated when playing.
The program generates automatically the block contour.
Placing marks:
To place marks, select the destination cells and click on the corresponding
button on the window. To enter an alphanumeric mark, type the desired
character at the ![]() box and then click on the
box and then click on the ![]() button. If the alphanumeric
autoincrement option in the options window is
checked, the character in this box is automatically advanced to the next one.
To select the color of a round mark, click on the
button. If the alphanumeric
autoincrement option in the options window is
checked, the character in this box is automatically advanced to the next one.
To select the color of a round mark, click on the ![]() button to show a color select window.
button to show a color select window.
Erasing marks and blocks:
To erase only marks, select the cells where desired and click on the ![]() button (note the lack of borders, as in every mark button).
button (note the lack of borders, as in every mark button).
To erase only blocks, select the cells where desired and click on the ![]() button (note the borders, as in every block button).
button (note the borders, as in every block button).
To erase blocks and marks from the selected area, click on the ![]() button.
button.
Hint: checking for unwanted magic blocks:
If a large block is created and subsequently some of it's basic blocks are
deleted, the remaining block can have separated parts and behaves like a magic
block but does not have the magic block color. To test for this situation,
clear the selection (clicking on the ![]() button), if necessary, and, while keeping an Alt key pressed, click twice
at each cell where there is a basic block. After the first click, the
complete block to which the basic block belongs will be totally selected.
After the second click, the selection will be cleared.
button), if necessary, and, while keeping an Alt key pressed, click twice
at each cell where there is a basic block. After the first click, the
complete block to which the basic block belongs will be totally selected.
After the second click, the selection will be cleared.
Hint: saving mouse clicks when creating two complex blocks that
together form a rectangle:
Instead of creating the blocks independently, create first a rectangular block
with the size of the rectangle. Then select cells for one of the desired
blocks and create the block.
Undoing and redoing:
Every time blocks, marks or the title are changed, the program memorizes the
alterations, allowing undoing them (clicking on the ![]() button) or redoing them (clicking on the
button) or redoing them (clicking on the ![]() button).
button).
Cell selection and grid changes do not participate in this process. The
last non-null selection can be restored by the ![]() button.
button.
Editing options:
The ![]() button
activates the options window that allows configuring the
grid, the barrier and magnetic block joining methods and the block shuffling
(select the Edit 1 or the Edit 2 pages).
button
activates the options window that allows configuring the
grid, the barrier and magnetic block joining methods and the block shuffling
(select the Edit 1 or the Edit 2 pages).
Board drawing size: if the Automatic board sizing item in the options
window is checked, the level drawing size is automatically adjusted to fit
the program window. If not checked, the size can be manually adjusted by
the "*", "/" and "?" keys or by the ![]() ,
,
![]() and
and ![]() buttons (respectively zoom in, zoom out and fit to window).
buttons (respectively zoom in, zoom out and fit to window).
Block shuffling:
The ![]() button allows shuffling the blocks at the selected cells. The marks will
stay in place.
button allows shuffling the blocks at the selected cells. The marks will
stay in place.
If a block is partially selected, it will be moved as if totally selected.
Keyhole blocks will be changed to frames and weak barriers to strong barriers.
Internally, the program represents all frames and keyholes as a single
block. So, all frames and keyholes selected will be moved as a single
block. To move them separately, change them into several blocks of another
type, do the shuffling and then change them back to frames or keyholes.
If the command is taking too much time to execute, to stop it, click on the ![]() button, press the Esc key or try to close the window or the program.
button, press the Esc key or try to close the window or the program.
The shuffling is based on a sequence of pseudo-random numbers calculated from a
seed. For the same level, the same selection and the same seed, the result
will be the same. After each successful shuffling, the program calculates
a new random seed. To enter a seed directly or to have the program
automatically calculate a new one, open the options window
and select the Edit 2 page.
The program uses a trial-and-error method. The program takes all blocks
from the selected area and begins to put back a block at a time in a random
place in this area. If a block cannot be placed, the program removes the
last block placed and tries a new position. Sometimes, the program needs
to remove several blocks and start over. If this is taking too much time,
a possible solution is to abort the shuffling and try a new seed. Another
possibility is to remove some blocks to ease the task, do the shuffling and then
add the removed blocks manually.
Even starting from a solvable level, there is no guarantee that the shuffled
level will have a solution. For an alternative that guarantees that a
solvable level will still be solvable after the shuffling, under certain
circumstances, see shuffle blocks.
Minimum and maximum level sizes:
The minimum size is 2 by 2 cells.
The maximum size is 64 by 64 cells.
The result of this command is the replacement of the current level by a new
level created by doing random moves with all movable blocks, ignoring all
block-mark and block-block interactions.
The move list is erased and the best solution and the records are probably no
longer valid.
If the command is taking too much time to finish, it can be aborted by pressing the Esc key or trying to close the program.
If the level has no marks other than destination and alphanumeric, there are no block-mark nor block-block interactions and the level is solvable, the result will be solvable too.
The shuffling is based on a sequence of pseudo-random numbers calculated from a seed. For the same level and the same seed, the result will be the same. After this command, the program calculates a new random seed. To enter a seed directly or to have the program automatically calculate a new one, open the options window and select the Edit 2 page.
See also block shuffling.
Keyboard shortcut: F12.
In the text below, where there is "file name", "shortcut to
file" is acceptable too.
1) While playing, to copy levels from the Windows Clipboard, press the Ctrl
and V keys at the same time or use the Copy from Clipboard menu
command. All levels in the Clipboard text, which must be in the Klocki
or SOK formats, will be used, including the moves if present. To stop the entry process, press the Esc
key or try to close the program.
2) While playing, press the K key or select the Read levels menu
command. A window will be shown prompting for a file name. All
levels in the file will be used, including the moves if present. To stop the entry process, press the Esc
key or try to close the program. See level reading
for compatible file formats.
3) While playing, drag one or more file names from a Windows Explorer
window to the main Klocki window and drop. All levels in all files
will be used, including the moves if present. To stop the entry process, press the Esc key or try
to close the program.
4) When editing a level, click on the ![]() button. Only the first level in the file will be used.
button. Only the first level in the file will be used.
5) When editing a level, select the whole level and
copy a level in the Klocki or in the SOK
formats from the Windows
Clipboard with the ![]() button.
button.
6) Create a new file type or alter an already existing one (see in the Windows
help how to do this), setting the action as open or any other. Set
also the program used to execute the action as the Klocki program.
If the action is open, a double left button mouse click on a file name
with the chosen type in an Explorer window will cause Klocki to
run normally and also include all the file levels. Selecting one or more
file names in an Explorer window and clicking with the right mouse
button, a menu will pop up. Click in the chosen action and Klocki
will run normally and also include all the levels from all the files, including
the moves if present.
7) Drag a file name from a Windows Explorer window to a Klocki
icon or shortcut to Klocki and drop. Klocki will run
normally and also include all the levels in the file, including the moves if
present. See level reading
for compatible file formats. There is no easy way to stop this entry
process.
Duplicated level titles:
When inputting levels except when editing and a level with the same title
already exists, the program asks whether to replace the previous level, to add
the new level or to cancel the input. If Repeat the answer next time
is checked, the program will repeat the action again the next time a title
repetition happens during one input. The program will ask again if the
duplicity happens in another input.
Opened file history:
The names of all files read or written are added to the list of files opened in
the past. See the history section of using
the file choice window.
Adding a level to a Klocki n.txt file:
A level can be permanently added to one of the Klocki n.txt
files: save the level in the Klocki format and
remove the moves, if any. Add the rest to an already existing Klocki
n.txt file, in any position. Or rename the file to Klocki n.txt,
where n is a number that does not conflict with any existing Klocki
n.txt file and add n to the list of numbers in the Initial files
field in the Game page in the options window).
You can also add an entry for the level in the Klocki.rec
records file.
See also:
Saving levels.
This window permits changing the level title without losing any other
information, like the move list.
Clicking on the Current title button, the title is restored to the
current level title.
The title must not start with spaces, or else the program cannot find the
corresponding records in the records file. If
the title is invalid, the OK button will be disabled and the message Invalid
title will be shown under the title entry box.
The best solution and the move records for each
level are identified by the level title. The presence of different levels
with the same title can upset the best solutions processing or produce invalid
record information. If there is another level with the same title, the
message will be Duplicated title.
Keyboard shortcut: T.
A window is shown allowing placing the level position after the chosen move
number. No move is erased from memory.
The level position follows the scroll bar position.
Keyboard shortcut: G.
The program can read from files levels saved in four formats:
- NBL format,
- DLL format,
- SOK format
- Klocki format
If the file extension is nbl, the file is considered to be in the NBL
format. If the extension is dll, DLL format.
Otherwise, the program assumes that the file contains text and
examines its second line. If this line has number of characters multiple
of 4, and if the characters 1st, 5th, 9th,
13th, ... are valid marks and if the characters 2nd,
6th, 10th, 14th, ... are
valid blocks, then the file is considered to be in the Klocki
format. Otherwise, in the SOK format.
In the DLL format, the move records are read too.
In the Klocki and in the SOK formats, the moves, if stored in
the file, are read too.
In the NBL and DLL formats, a block contour may not be the same
shown by the Bricks Level Editor or the Bricks
program because Klocki generates the contour automatically.
Keyboard shortcut: K.
See also:
How to input levels.
Using the file choice window.
Saving levels.
Reading Bricks moves
It's possible to save a level in three program readable formats:
- NBL format
- Klocki format
- SOK format
- DLL format
In the Klocki format (keyboard shortcut: S), the current level and
its moves are saved. The coordinates saved are relative to the upper left
level corner and are independent from the current coordinate
origin.
In the SOK format (keyboard shortcut: 4), the moves are saved too.
In the NBL format (keyboard shortcut: U), only the current level is saved, without the moves.
In the DLL format (keyboard shortcut: Y), user
chosen levels and their move records are saved, without the moves.
If the Prompt on file rewrite item in the Options
window is checked, the user is prompted for confirmation when saving a file
and a file with the same name already exists. If not checked, the file is
overwritten without warning.
The program expects that SOK files have sok extension, NBL
files have nbl extension, DLL files have dll extension and
that Klocki files don't have SOK, NBL, DLL or GIF
extension. If the extension is not what is expected and the Confirm
non-standard extension files item in the Options
window is checked, the program will prompt for confirmation, offering the
opportunity to change the file format.
Other ways to export a level:
a) use the Copy to Clipboard (Klocki) menu
command or press both a Ctrl and the C keys simultaneously, which
copies the current level and its moves to the Windows Clipboard, in the Klocki
format.
b) use the Copy to Clipboard (SOK) menu
command or press both a Ctrl and the B keys simultaneously, which
copies the current level to the Windows Clipboard, in the SOK
format.
For reading NBL, Klocki, SOK and DLL files, see How
to input levels.
See also:
Level reading.
Write as GIF image or animation.
Using the file choice window.
Writing Bricks moves.
Saving as Bricks for Windows DLL
This command allows saving up to 48 levels in the Bricks
for Windows DLL format. This set of levels form a
"game" for Bricks.
To do that, Klocki needs the following information:
- A name for the game, which will be shown in the Bricks Change game
menu. Example: "World Competition".
- A prefix for the name of the file where the moves will be saved to and loaded
from by the Bricks Save board and Load Board commands and
by the Klocki Write Bricks moves and Read
Bricks moves commands. Example: "WorldComp_". This
file name is built concatenating the prefix, the player name and the level
number. Example: player "Joe" and level number 9. The
resulting file name would be "WorldComp_Joe.b 9".
- The level titles.
It's possible also to specify an introductory text that will be shown by Bricks
when the game is changed to the game saved.
Selecting the levels to save:
A list of all levels currently in memory is shown, except the levels which have:
- more than 16 master blocks, or
- marks covered by blocks at the starting position, or
- more than 204 non-master blocks and blockade switches, or
- teleport elements, or
- boxes, or
- alphanumeric marks, or
- don't cover marks.
In other words, levels not supported by Bricks are not listed and thus
cannot be selected.
To highlight a single line, click on the line without pressing any of the Shift
or Ctrl keyboard keys.
To highlight a range of lines, highlight the first line as above and then,
pressing a Shift key, click on the final line.
To add or remove a line from the highlighted lines, press a Ctrl key and
click on the line.
To add levels to the selection list, highlight their lines and click on the Select
button. The lines of the selected levels will be marked by "*"
characters.
To unselect levels, highlight their lines and click on the Exclude
button.
If less than 1 level or more than 48 levels are selected, the OK button will be disabled.
The levels selected (marked with an "*") will be saved in the order
they are in the list. To change the order, highlight one or more lines and
click on one of the Up, Down or Top buttons: clicking on
the Up or Down buttons, will move the highlighted lines one
position up or down in the list. Clicking on the Top button, will
move the highlighted lines to the top of the list.
The move records will also be saved in the DLL. To change a record,
type the record in the record entry box, highlight the lines of the
corresponding levels and click on the Change record to: button. The
valid range is from 0 to 65535.
When ready, click on the OK button. The program will then prompt
for a file name and location. If the chosen file name does not have a dll
extension and the Confirm non-standard extension files item in the Options
window is checked, the program will prompt for confirmation.
Limitations:
An alphanumeric block will be saved as non-alphanumeric.
The blocks contour sometimes are not faithfully reproduced.
See also:
Level reading.
This command allows saving the current level moves to a file in a format compatible with the Bricks Load board command.
The level must be a level contained in a Bricks DLL,
because the file will contain only the moves, without any block or mark
description.
When this command is issued, a window appears, maybe showing a DLL file
name. If no name is shown or the DLL is not the desired one, click
on the Choose DLL ... button to choose another one. The file will
be written in the folder that contains this DLL. If the file name does not have a dll
extension and the Confirm non-standard extension files item in the Options
window is checked, the program will prompt for confirmation.
If a DLL file name is shown, the window presents also the title of all
levels in the DLL. Select one level clicking on it. If no
level is selected, the OK button will be disabled.
Type the player name in the Player box.
A Bricks DLL can contain a prefix for the name of the file to
store the moves in the Load board and Save board commands. Klocki
will use this prefix, the player name and the level number to build the file
name. Example: suppose the prefix contained in the DLL is
"name_", the player name is "John Doe" and the level number
is 23: the resulting file name will be: "name_John Doe.b23".
See also:
Saving as Bricks for Windows DLL.
Reading Bricks moves.
This command allows reading the current level moves from a file in a format compatible with the Bricks Save board command.
The moves are executed starting from the initial position.
The level must be a level contained in a Bricks DLL,
because the file will contain only the moves, without any block or mark
description.
When this command is issued, a window appears, maybe showing a DLL file
name. If no name is shown or the DLL is not the desired one, click
on the Choose DLL ... button to chose another one. The file to read
is supposed to be in the folder that contains this DLL. If the file name does not have a dll
extension and the Confirm non-standard extension files item in the Options
window is checked, the program will prompt for confirmation.
If a DLL file name is shown, the window presents also the title of all
levels in the DLL. Select one level clicking on it. If no
level is selected, the OK button will be disabled.
Type the player name in the Player box.
A Bricks DLL can contain a prefix for the name of the file to
store the moves in the Load board and Save board commands. Klocki
will use this prefix, the player name and the level number to build the file
name. Example: suppose the prefix contained in the DLL is
"name_", the player name is "John Doe" and the level number
is 23: the resulting file name will be: "name_John Doe.b23".
See also:
Saving as Bricks for Windows DLL.
Writing Bricks moves.
Write as GIF image or animation
The current level is written as images in the GIF format. To see
the images, the file must be opened with a graphics program that supports GIF
image files.
What to write:
Initial position: only one image is written, showing the level starting
position.
Current position: only one image is written, showing the level present
position.
All steps: all steps are written as an animation, one frame or image for
each step, from the starting position to the last step.
All moves: all moves are written as an animation, one frame or image for
each move, from the starting position to the last move.
The selected block indication is not drawn.
The time between frames, in seconds, is given by the Step time parameter.
If there is only one frame to write, the Step time parameter will have no
effect and the file format will be GIF87a. Otherwise, the resulting
animation total time will be shown at Total time and the file format will
be GIF89a.
If the Loop item is checked and all steps or all moves are written, instructions will be added to the file to automatically repeat the animation from the beginning when it ends.
Information provided by the program:
The number of frames is shown at Frames.
The animation speed is shown at Frame rate.
The frame dimensions are shown at Image width and Image height, in
pixels.
The image size is the level drawing size at the main program window. This
does not include the borders drawn by the program to center the drawing in the
window. To resize the image, the main program window must be
resized. If the Automatic board sizing item in Options
is not checked, the "*" and "/" keys can be used to change
the size.
Writing:
To start the writing, click on the Write button. A file
choice window will be shown to allow choosing the file name. If the
chosen file name does not have a gif extension and the Confirm
non-standard extension files item in the Options
window is checked, the program will prompt
for confirmation.
To interrupt, click on the Stop button.
To close the window, click on the Close button. If a writing
operation is occurring, it will be aborted.
If the process is aborted, the resulting file may be an invalid GIF file.
Keyboard shortcut: W.
See also:
Saving levels.
Using the file choice window.
Before writing or reading a file, the program shows a window to allow
choosing a name and a location for the file.
In the text below, unless specified otherwise, "list" means "file
and folder list".
The file name specification can be done by several means:
- typing a name in the File box and clicking on the OK button.
- clicking on a file name in the list and then on the OK button.
- double clicking on a file name in the list.
- clicking on the History box, clicking on a name in the list that
appears there and then on the OK button.
Notes:
If the file does not exist during a file reading operation, the OK button
will be disabled.
Whenever this window is opened, the folder listed will be the folder of the last
file specified. If this file still exists, its name will be selected and
made visible in the list.
When a name is clicked on in the history list, its folder will be listed.
If this file still exists, its name will be selected and made visible in the
list.
When changing the list presentation mode, when sorting the list, when changing
the filter or when navigating through the folders, if the file whose name
appears in the File box exists in the current folder and it is in the
list, its name will be selected and made visible in the list.
The partial file name (name and extension) is limited by the program to 246
characters. The full file name (disk unit, folders, name and extension) is
limited by the program to 254 characters.
The current folder:
The current folder path is shown above the list. If there is not enough space in
the line for the whole name, it will be truncated. Pausing the mouse over
the path for a while, the whole path will appear.
Navigating through the folders:
To go to the folder one level up, click on the ![]() button.
button.
To go to another disk unit, click on the ![]() button until a drive list is shown and then choose the unit.
button until a drive list is shown and then choose the unit.
List presentation modes:
For each item in the list, an icon is shown. When the item is the name of
a file, the icon is the icon of the program that opens the file.
To change the presentation mode, click on one of the buttons:
![]() (column
list mode): only small icons and names are shown. The list is organized by
columns.
(column
list mode): only small icons and names are shown. The list is organized by
columns.
![]() (row list
mode): only small icons and names are shown. The list is organized by
rows.
(row list
mode): only small icons and names are shown. The list is organized by
rows.
![]() (large
icons mode): only large icons and names are shown. The list is organized
by rows.
(large
icons mode): only large icons and names are shown. The list is organized
by rows.
![]() (details
mode): for each item, a small icon, the name, the item type, the size in bytes,
the date of the last modification and the read-only, hidden, system and archive
attributes are shown.
(details
mode): for each item, a small icon, the name, the item type, the size in bytes,
the date of the last modification and the read-only, hidden, system and archive
attributes are shown.
Changing the column widths:
When the details mode is selected, the width of a column can be changed by
dragging the right border of the column header.
In the other modes, all column widths are the same as the Name column
width of the details mode: to change the column widths, switch to the details
mode, change the left column width and then switch back to the previous mode.
Sorting the list:
During the details mode, clicking on a column header, the list will be sorted on
the columns contents.
If the column clicked on was the same as the previous one, the order will be
inverted. If not, the list will be sorted is ascending order. The
sorting column header shows a down arrow for ascending order or an up arrow for
descending order.
In any presentation mode, clicking on the list with the right mouse button, a
menu will appear. This menu allows choosing directly the column and
direction of the sorting. In this menu, a mark is shown next to the
current sorting criterion.
The folders always stay at the top of the list.
Searching for a file in the list:
When the list has input focus (for instance, after clicking on a name or, while
in the details mode, after clicking on a column header), when a key is pressed,
the next folder or file whose name begins with the typed character will be
selected. If the name wanted starts with a character with a diacritical
mark, the character must also be typed with this mark.
The arrow keys and the Page Up, Page Down, Home and End
keys can also be used to select another file or folder.
Filtering the list:
The List files radio buttons allow choosing which files will be included
in the list.
If the first radio button is checked, all file names will be shown.
If one of the next five radio buttons is checked, only files with extensions txt,
nbl, gif, dll or sok will be shown.
The seventh radio button selects a user customizable more general filter.
The filters are applied only to file names, all folder names will always be
shown.
The filtering is case-insensitive: for example, klocki.txt is the same as
Klocki.Txt.
These filters are only this: filters for the file list. The program does
not automatically appends any extension if a name is written without extension.
Custom filter:
The custom filter is a sequence of simple filters, separated by
";". Only file names that pass at least one simple filter will
be shown. For instance, to show only files with names starting with
"w" or files with "brk" extension, type
w*.*;*.brk
in the custom filter box and check the sixth radio button.
Each simple filter is made of two parts separated by ".". The
first part corresponds to the part of the file name before the last period and
the second to the part of the file name after the last period. In order to
pass a simple filter, the file name and extension must pass both parts.
Example: file name solution.txt.lnk and simple filter sol*.lnk: solution.txt
will be compared to sol* and lnk will be compared to lnk.
The part format must be one of these:
| text | The part must be exactly text. |
| text* | The part must start with text and can be followed by zero or more characters of any type. |
| *text | The part must end with text and can be preceded by zero or more characters of any type. |
| *text* | The part must contain text in any position. |
| text1*text2 | The part must start with text1, must end with text2 and, between these two subparts, can have zero or more characters of any type. |
A part can have one or more "?" characters, meaning the character
at each "?" position can be of any type.
Hint:
If the current folder has too many files, checking the custom filter radio
button and then editing the custom filter can result in a program
slowdown. In this case, it may be best to check another radio button, type
the filter and, after finishing typing, check the custom filter radio button.
Options button:
The ![]() button
is used to show the options window, which allows
choosing, among other things, whether to prompt the user for confirmation before
overwriting a file and how the file attributes are shown.
button
is used to show the options window, which allows
choosing, among other things, whether to prompt the user for confirmation before
overwriting a file and how the file attributes are shown.
History:
Each time a file is read or written, its name is added to the top of the history
list and that list is written to the Windows Registry. The history
list then remains sorted from the last to the first file opened.
If there are two or more program instances running at the same time, all
individual lists will be merged into a single list.
If the file is a shortcut or link file, the name added to the list is the name
of the destination file and not the name of the shortcut file.
The program doesn't set a limit to the list size. Maybe it can be
necessary to clear this list from time to time by clicking on the ![]() button.
button.
This history is written in the entry:
\HKEY_CURRENT_USER\Software\Emir Palandi\name\History
where name is the program name without the ".exe" (normally Klocki).
If the program is renamed, the place where this information will be written will
change too and the program will not be able to read the history written before
the name change.
Hint:
Suppose you just solved a new level and want to save the solution, but the
folder where you usually store the solutions is far away from the current
folder. Instead of doing too much navigation through the folders, you can
do the following: click on the History box and select any file in the
solutions folder, preferentially one with a name resembling the name you want to
give to the new file. The solutions folder will be listed and the file
name will appear in the File box. Edit the name in this box and
then click on the OK button.
This window allows these choices:
1) Game options page:
Draw marks over blocks: if this option is
checked, marks are drawn over the blocks. If not checked, a block hides a
mark when both are at the same cell. During level
editing, marks are always drawn over blocks. Unchecking this option
can be useful, for instance, to reduce clutter in the level drawing. This
option is also directly available via keyboard (letter Q) or the Marks
over blocks Setup menu item.
Mark the selected block: Whenever a block is moved, by the mouse or by
the keyboard, or when a movable block receives a mouse click, it becomes the
selected block, which can be moved by the arrow keys. If this option is checked,
a white dot is drawn on the selected block.
Bricks compatibility: when a keystone is
simultaneously moved from over a blockade switch and contacts a keyhole, if this
item is checked, no inversion will take place. If it's not checked, the
inversion will occur.
Automatic board sizing: if checked, the level drawing size is
automatically adjusted to fit the program window. If not checked, the size
adjustment is done manually by the "*", "/" and
"F" keys or the Zoom in, Zoom out and Fit to window
menu commands. When editing a level, the size can
be manually adjusted by the "*", "/" and "?" keys
or by the ![]() ,
, ![]() and
and ![]() buttons (respectively zoom in, zoom out and fit to window).
buttons (respectively zoom in, zoom out and fit to window).
Show mouse coordinates: controls whether a panel with the mouse coordinates
will be displayed or not in the status bar.
Show identifiers and individual moves: if checked, a panel will be
displayed in the status bar showing the identifier
and the number of moves done by the block under the mouse cursor.
Show total moves and records: if checked, a panel will be displayed in
the status bar showing the number of
moves and steps (current, total and record).
The Initial file number list:
The list can be blank or can contain one or more non-negative integer numbers,
separated by commas.
At program startup, Klocki n.txt level files whose numbers n
are in the list will be read in the order of their numbers in the list. If the
list is blank, the Klocki 0.txt file will be read.
2) File options page:
Prompt on file rewrite: if this option is checked, the user is prompted
for confirmation when saving a file and a file with the same name already
exists. If not checked, the file is overwritten without warning.
Show hidden files: allows/disallows showing items with the hidden
attribute in the file choice window.
Show system files: allows/disallows showing items with the hidden
attribute in the file choice window.
Show file attributes: allows/disallows showing items attributes in the
file choice window.
Show file attributes as font style: in the file choice window,
allows/disallows showing
- the name of hidden attribute items with italicized style,
- the name of system attribute items underlined and
- the name of read only attribute items with a horizontal line through them.
Confirm non-standard extension files: when reading or writing files
and the file name extension is not the one the program expects, like, for
example, writing DLLs with GIF extension, if this item is checked,
the program asks for confirmation, maybe offering the opportunity to change the
save file format.
The game and file options and the Windows
Registry:
The game and file options are read from the Windows Registry when the
program starts or when the Read game options from the Registry or Read
file options from the Registry buttons are clicked on. These two
buttons allow synchronizing the game and file options when there are several
program instances running simultaneously, as changing the options in an instance
doesn't affect the options of another instance.
When this window is activated, the options shown are the currently ones in
memory and can differ from the ones in the Windows Registry.
When the OK button is clicked on the game and file options are written to the Registry.
These options are written in the entry:
\HKEY_CURRENT_USER\Software\Emir Palandi\name\Options
where name is the program name without the ".exe" (normally Klocki).
If the program is renamed, the place where these options will be written will
change too and the program will not be able to read the options written before
the name change.
3) Edit 1 page:
Grid:
If the Show grid box is checked, a white grid will be drawn during level
edit. The starting row and column and the vertical and horizontal
spacing can be chosen. The default grid starts at the level top row, the
left column, and the vertical and horizontal spacing are 1 unit. The
distance unit is 1 cell.
The level borders are always drawn.
4) Edit 2 page:
Join barriers:
Controls the insertion of barriers during a level edit:
if it's checked, when a barrier is inserted, all other barriers touched by the
new barrier are joined together (the borders disappear). If it's
unchecked, the new barrier is independent from the other barriers (the borders
remain).
Join magnets:
Controls the insertion of magnet blocks during a level edit:
if checked, magnet blocks touching other magnet blocks or antimagnet blocks
touching other antimagnet blocks are joined together, as if they touched during
normal play. If unchecked, these blocks are initially independent, and
they can be separated during normal play.
Alphanumeric autoincrement:
If checked, after the placement of an alphanumeric block or alphanumeric mark
during a level edit, the alphanumeric character
advances automatically to the next one.
Block shuffling:
These two items refer to the random-number seed used by the block
shuffling and by the shuffle blocks commands to
control the shuffling. A new random-number seed can be manually entered
or, clicking on the Random button, the program generates automatically a
new one. This number must be from 0 to 4,294,967,295.
Opening the window:
To open this window, during normal play, select the More options Setup
menu item or press the letter O key. When editing
a level, click on the ![]() button or press the M key. At the Write as GIF
animation window, click on the Options button or press the letter O
key.
button or press the M key. At the Write as GIF
animation window, click on the Options button or press the letter O
key.
What's the best solution?
Each time a level is solved or read from a file with a solution or from the Windows
Clipboard with a solution, the program compares the solution to the best
solution in the best solutions file (Klocki.sol, in the
program folder). The shortest solution (the one with the least number of
moves or, in the case of a tie, the one with the least number of steps) is
written to the Klocki.sol file. If this file does not exist, it's
automatically created in the program folder.
When the program starts, the best solution for the level shown, if it exists, is
automatically loaded.
After the level is changed by one of the commands: Next level, Previous
level or Level list, if no move was done in the new level, the best
solution for the level, if it exists, is also automatically loaded.
The best solution for each level is identified by the level title. The
presence of different levels with the same title can upset the best solution
processing.
The best solution window:
Apply button: the moves found in the Klocki.sol file
for the current level replace the current level moves. The previous moves
are lost.
Write button: forces writing the current moves, even if they are not a
solution, to the best solution record for the current level in the Klocki.sol
file, but these moves are replaced when a real solution is found.
When this window is activated, if the moves found are a solution, the message Best
solution: is shown. If the moves come from a forced write, the
message is Move list:. The number of moves and steps are also
shown.
Erase button: erases the best solution record for the current level from
the Klocki.sol file.
Note that, when this window is shown, if there are moves to apply, the Apply
button is the default button. So, to restore a best solution, usually it's
enough to press only two keys: the B key to open the window and the space
key to apply the moves.
Keyboard shortcut: B.
See also:
Choosing a level - Scoreboard.
A Klocki file is a plain text file that can be
edited by common plain text editor programs. It can contain one or more levels,
each level with or without the moves.
Each level is composed of three parts:
First part:
Is the first line and contains the level title. For program versions 6.0
or later, the title must be between double quotation marks, but not for earlier
versions. In both cases the title must not begin with space characters, or
else the program will be unable to find the corresponding record in the Klocki.rec
record file. The best
solution for each level and the record information are identified by the
level title. The presence of different levels with the same title can
upset the best solution processing or can produce invalid record
information. See also incompatibilities
between versions.
Second part:
Is the level initial position, describing the blocks and marks, organized line
by line, from top to bottom, each line from left to right and cell by cell.
There are four characters for each cell:
The first character indicates the mark:
".": no mark,
"+": destination,
"/": trap,
")": water,
"\": hole,
"<": blockade switch,
"^": don't cover,
"_": glue,
":": ice.
"a" to "z", "A" to "Z", "ç"
(character number 231), "Ç" (character number 199) and "0"
to "9": alphanumeric marks. A "0" (zero) alphanumeric
mark is shown as "Ø" to avoid confusion with the letter
"O".
Character numbers 161 to 191 and 247: round marks.
The second character indicates the basic block type:
".": no block,
"#": frame,
"*": strong barrier,
"!": weak barrier,
"&": keystone,
"%": keyhole,
"(": blockade,
"$": eliminator,
"[": normal,
"]": magic,
"{": magnet,
"}": antimagnet
"-": horizontal,
"|": vertical.
">": cover,
";": hover,
"~": teleporter,
"@": normal master,
"?": magnet master,
"z": antimagnet master,
"=": horizontal master,
""": vertical master,
"Z": hover master,
"Y": eliminator master,
"y": cover master,
"w": keystone master,
"x": tire,
"X": tire master,
"v": box,
"V": box master,
character numbers 161 to 191 and 247: round blocks.
The third and fourth characters are an identifier. They can be any
character, except the "ÿ" (number 255), reserved for the alphanumeric
blocks. The case is important ("a" and "A" are
different). Basic blocks with the same identifier and same type form a
block.
Frames ("#") and keyholes ("%") do not need identifiers, as
the program handles them automatically.
A two-period ("..") identifier indicates that the basic block forms a
1 x 1 block. So, a 1 x 1 block does not need a identifier.
For an alphanumeric block, the third character is "ÿ" (character
number 255) and the fourth character is the alphanumeric identification, in the
same range as the alphanumeric marks. A "0" (zero) alphanumeric
block is shown as "Ø" to avoid confusion with the letter
"O".
Every type of basic block can form blocks larger than 1 x 1. A block move
as one unit, even if it has separated parts. If the block is a barrier,
all of its parts must be turned weak to be eliminated, even if they are
separated.
These identifiers are not necessarily the same as those displayed with the Identify
blocks command.
If there are more than one teleport block, only one will be effective.
The program generates automatically the block contour.
Empty cells ("....") at the end of the line can be omitted. If
there is a band of empty cells at the right, at least one line must have full
width. An empty line needs at least one "...." group.
The minimum size is 2 by 2 cells. Smaller levels will have empty borders
added to comply.
The maximum size is 64 by 64 cells. Larger levels will be truncated to
comply.
Third part:
The third part is the moves, with each line in the format
M)L,C:x
or
L,C:x
or
M)L,C:ppp...p
or
L,C:ppp...p
resembling the move list in the Move list command.
M is the move number, with one or more digits.
L is the vertical coordinate of any basic block
of the block being moved, with one or more digits. The top level line has
coordinate 0.
C is the horizontal coordinate of any basic block of the block being
moved, with one or more digits. The left level column has coordinate 0.
x indicates the move is a barrier removal.
ppp...p is a sequence of one or more steps made by the block. Each p
is one of the characters: >, <, v or ^,
meaning, respectively, right step, left step, down step and up step.
The steps made automatically by a block when it slides over ices are not
indicated.
A barrier removal is listed in a separated line, but its corresponding move
number is the same as the next move if it is at the start of the moves or is the
same as the previous move if it is not at the start.
For program versions 6.0 or later, a move line needs to start with a space
character, but does not need in earlier versions. In both cases, in each
move line, spaces can be added anywhere to improve readability.
The Klocki n.txt files are Klocki files without the
levels' third part.
When reading files or inputting from the Clipboard, in case of invalid
formats, the program shows an error message indicating the line and column (both
starting at 1) in the file or Clipboard text where the error was
detected.
An SOK file is a plain text file that can be edited by common plain text editor programs. It's usually used to save Sokoban levels. It can contain one or more levels, possibly with moves.
Input:
Separating lines are empty lines or lines not starting with the characters "#",
"%" or space. There must be at
least one separating line between the levels.
Once the program decides that the file contents or the text from the Clipboard is of type SOK (see Level reading) it classifies the text in two subtypes: SOK and XSB. Files with xsb or stb extensions are considered of subtype XSB. Files with sok extension are considered of subtype SOK. Files with extension different from these three or text from the Clipboard are of subtype SOK if the first line starts with "::", or else of subtype XSB.
For subtype XSB, the level title is given by
a separating line after the level starting with "Title:". The title will be the part
of this line starting at the first non-space character after the ":".
If this line doesn't exist, the title will be the last line before the level.
For subtype SOK, the title will be the last non-empty line, preceded by an
empty line (to differenciate from moves lines), before the
level. If there is no such line, the title will be given by
a line before the level starting with "Title:". In the
last case, the title will be the part
of this line starting at the first non-space character after the ":".
If the program doesn't find a title, the title will be the file name (or
"Clipboard" when importing from the Windows Clipboard) plus a sequence number.
Lines starting with a space, "#" or "%" are the level initial position, describing the blocks and marks, organized line
by line, from top to bottom, each line from left to right and cell by cell.
Each character correspond to one cell.
When importing a level, characters are interpreted as follows:
|
"#" or "%" |
frame |
|
"@", "p" or "r" |
normal block (the warehouse keeper) |
|
"+", "P" or "R" |
normal block (the warehouse keeper) over a destination mark |
|
"$" or "b" |
master box |
|
"*" or "B" |
master box over a destination mark |
|
".", "o" or "O" |
destination mark |
others |
empty cell |
The minimum and maximum level sizes are the same as the Klocki format ones.
After the level, for the SOK subtype, lines preceded by a non-empty line (to differenciate from the title line) and whose characters are only "l", "L", "r", "R", "u", "U", "d", "D" or "0" to "9" will be interpreted as move lines, for a single warehouse keeper, according to the table:
| "l" or "L" | step left |
| "r" or "R" | step right |
| "u" or "U" | step up |
| "d" or "D" | step down |
After the level, if a line starting with 'boxorder" and having a list of numbers is found, the level is scanned from left to right and from top to bottom. The master boxes found receive the alphanumeric identifier relative to the corresponding number in the list and are changed to normal boxes. If the number is greater than 64 or the list already ended, the box is left as is. If a line starting with "goalorder" is found, the same is done to the destination marks, which are changed to alphanumeric marks. The identifier/number correspondence table is givem below.
Output:
When exporting a level, the first line written is a line starting with
"::" to ease identify the format.
Then an empty line, a line
with the title and another empty line.
Then the level is written using the characters:
"#",
"@",
"+",
"$",
"*" and
"." and spaces for empty cells. Blocks other
than boxes or master boxes are written as warehouse keepers.
After the level, a line with the title is written, starting with "Title:
".
Then, if the level has alphanumeric boxes or marks, four lines are written:
"Comment:", "boxorder ...", "goalorder ..." and
"Comment-End:". A "boxorder ..." line contains a
number list corresponding to the alphanumeric boxes identifiers. The
"goalorder ..." line is the analog for the alphanumeric marks.
To assemble these lines, the level is scanned from left to right and from top to
bottom. The correspondence is made according to the table below.
Destination marks and non-alphanumeric boxes receive the number 99.
Identifier |
Number |
1 . .. 9 |
1 ... 9 |
A . .. Z |
10 ... 35 |
Ç |
36 |
a ... z |
37 ... 62 |
ç |
63 |
0 |
64 |
Then the program writes a "Moves:" line, the move lines and then an empty line.
The moves are written with at most 70 characters per line, assuming a single warehouse keeper, using the characters :
"l",
"r",
"u" and "d".
When exporting a level in this format, it's not checked if the
level is a valid Sokoban level, that is, it has (between parentheses what happens):
- marks other than destination or alphanumeric (ignored).
- non-frames fixed blocks (written as frames).
- non-master boxes (written as boxes).
- more than one movable block different than box or master box (written as warehouse
keepers).
- no moveable block other than boxes or master boxes (written without warehouse
keepers).
- number of boxes different than the number of destination marks (written as is).
- non-frame blocks larger than 1x1 (divided into 1x1 blocks).
- warehouse keepers and boxes not totally surrounded by frames (written as is).
The move and step record information is stored in the Klocki.rec
file, in the same folder as the program.
This file is a plain text file, with one line for each
level.
Each line has three fields: the moves record, the steps record and the level
title. There must be one or more spaces between each field. One or
more spaces can exist at the line start. There must not be spaces after the
level title.
The number 0 means an unknown value. The largest value accepted is 99999.
The lines can be placed in any order. The program matches the records and
the best solutions by the level title.
See also:
Choosing a level - Scoreboard.
- The most important features first: The program doesn't aim to make the user's life miserable. The user remains in control of his or her own computer. The work done by the user to set up the system to his or her own preferences, needs and conveniences is respected. The program does not do those infuriating automatic file association changes (the double clicking and right-button clicking actions on any file name on a Windows Explorer window remain the same). The program also doen't add any item to Windows menus like, for example, "Send to" or "New". Except for the best solution file, there is no automatic change of files that the user needs or wants to keep untouched nor creation of folders at inconvenient places (if the "My documents" folder or other folders are neatly organized, they will remain so). The level files are not automatically changed, except if the user issues a file save command. Except for entries in the Windows Registry to store some user options, the program does not make any system change. Except for the best solution file processing and option Registry writing, there is no action done without user request or permission. Klocki has no parts explicitly written to produce sounds. If any sound is emitted while operating the program, it must be from Windows.
- A list of all moves for all levels is kept in
memory, allowing undoing and redoing the moves at will.
- The program window can be resized. The board drawing automatically
expands and contracts to fit the window or the drawing size can be manually
adjusted (see game options).
- There can be several instances of the program running simultaneously, allowing
solving different levels at the same time, comparing different solutions for the
same level or transferring moves from one instance to another via Windows
Clipboard (see Move list).
- Status bar with mouse position coordinate
display, current move position and level records and identification
and number of moves of the block pointed by the mouse.
- Several keyboard shortcuts during normal operation and
during level editing. While editing, one hand can
select the parts to edit with the mouse and the other hand can issue commands
with the keyboard.
- External level files, possibly with moves, in human-readable plain text
format (Klocki format, SOK format), permitting
editing the levels and the moves.
- Command to save a level and moves as GIF animation.
- Automatic generation of new levels (see block
shuffling and shuffle blocks).
- Automatic cancellation of redundant steps: when the last step is in the
opposite direction than the penultimate step and the step is reversible (no
blocks and no marks were altered and the only changing was the block move), both
steps are erased from memory. If the player executes several steps and then does
the same steps in the opposite order and in the opposite direction, the game
behaves as if these steps were not played. Exceptions: when a block slides
over ices or is teleported.
The levels included in the program were designed by:
Fifteen: Sam Loyd.
24-puzzle: Fifteen
variation.
43, 13mags, Alpha1, Ana2,
April2,
Ariel,
Berenice, Brad, Brad3, Bradfin, Calanda, Carpeta,
Corida2, Cyr8, Cyrus, Delia5, domino6, E-Customs, Elisa,
Emir, Emir3, Fabrica2, Ferma, Haltera, Hover dance, Gool, Graba,
icebergs2, Iu liu, Lucia_V, Magnus,
Mango, Mango+1, Mango C, Nestor, Ninive, New year, Papirus4, Poseidon,
Praegel2, Sanctuary_b, Schmetterling, Sine, Spazier2, St.Helena, Stejarul, Sorcova,
Verzui and Werft3: Cristian Constantinescu.
Domino6E: domino6 variation
by Emir Palandi.
Piano Moving 2: unknown. Piano Moving 1, 3, 4 and
5: Piano Moving 2 variations by Emir Palandi.
Others: Emir Palandi.
Incompatibilities between versions:
Because the Klocki file format was changed to accommodate the alphanumeric blocks and marks, problems can happen when a version 6.0 or later program reads Klocki format files written by a previous version program or vice-versa. A version 6.0 or later program distinguishes the format by the first character of the file: in the new format it must be double quotation marks (") and in the older format it can be any character.
- Version 6.0 or later program reading old format files:
a) The first level title does not start with double quotation marks: no
problem.
b) The first level title do start with double quotation marks and ends or
not with double quotation marks: the program will treat the file as a new format
file. The level titles that start with double quotation marks will be
shown without the quotation marks and the corresponding records won't be
recognized. If there are moves in the file, the program can be confused
and not recognize the boundary between levels. Workarounds:
1) Edit the file, suppressing the double quotation mark at the start of the
first level. Read the file. Use the title
change command to add a double quotation mark to the start of this level
title. Save the levels that were in the file. Reassemble the file.
2) Manually convert the file to the new format: add double quotation marks to
the start and to the end of all titles and add a space character to the start of
every move line.
- Version earlier than 6.0 program reading a new format file: the titles will be shown between double quotation marks, the corresponding records will not be recognized. Work around: edit the file, suppressing the quotation marks. Anyway, alphanumeric blocks and marks will be ignored.
These rules are valid also for the Klocki n.txt level
files. If you want to add new levels to these files and they are in the
old format, there are two possibilities:
- Convert the files manually to the new format, adding double quotation marks to
the start and to the end of all titles.
- Leave them as they are now, in the old format. Suppose, for example,
that there are two files loaded at startup, Klocki 0.txt and Klocki
1.txt. Create a file named, say, Klocki 2.txt, add levels in
the new format to this file and add levels in the old format to the other two
files. Open the Options window and fill the Initial
files field as follows:
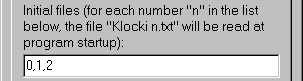 .
.
At startup, the program will read level from these three files.
- In the write Bricks moves and read Bricks moves commands, if the level has moves where a normal [anti]magnetic block joins several [anti]magnetic masters at the same time, Bricks and Klocki sometimes do not accept some moves as valid.
- When importing level with moves, if some move is invalid, sometimes the error message refers to a line, but there is no sense in talking about lines for, for example, Bricks DLLs, or the line has, aparently, nothing wrong. This happens because the program does not process the files directly, but first transforms them to the Klocki format and the line refers to the Klocki format and not to the input file.
System requirements:
- Windows 95 or compatible (however, tested only with Windows XP).
- Video monitor with 800 x 600 resolution or greater and 16-bit colors or
more.
- An HTML document visualization program, registered within Windows
to open HTML files (used for viewing the Klocki.htm help
file). This requirements is usually already satisfied if there is an Internet
browser program installed in the system. It was tested only with Internet
Explorer version 6.2 when the program help buttons were clicked on.
The Netscape and Opera browsers opened directly the Klocki.htm
file without problems.
Installation (English language):
- Create a folder for the program.
- Expand this file, putting all files in this folder.
The program creates, when necessary, two entries in the Windows Registry:
\HKEY_CURRENT_USER\Software\Emir Palandi\Klocki\Options
and
\HKEY_CURRENT_USER\Software\Emir Palandi\Klocki\History
to store the program options and the opened file history.
Installation (Portuguese language):
- Create a folder for the program.
- Expand this file, putting all files in this folder.
The program creates, when necessary, two entries in the Windows Registry:
\HKEY_CURRENT_USER\Software\Emir Palandi\Klocki\Opções
and:
\HKEY_CURRENT_USER\Software\Emir Palandi\Klocki\Histórico
to store the program options and the opened file history.
Installing both languages:
Both languages cannot be directly installed in the same folder because the file
names are the same. Install in different folders or install one of them,
change the names of ALL FILES this way: where there is
"Klocki", change to, for example, "KlockiX", and then
install the other language. The image folder can be the same because there
are no conflicts.
The Registry options and opened file history are independent.
It's recommended to choose one language and then always use the same one,
because the keyboard shortcuts are different and this can cause confusion.
Uninstallation:
Manually delete the program folder and the Registry entries.